Refrigerant Leak Repair
We trace refrigerant leaks with electronic detectors, bubble tests and nitrogen pressure, then repair and recharge by weight.
Learn moreCooling
AC RepairAC InstallationAC ReplacementAC Tune-Up & MaintenanceRefrigerant Leak RepairAC Compressor ReplacementEvaporator Coil ReplacementAC Water Leak & Drain Line RepairHeating
Furnace RepairFurnace InstallationFurnace ReplacementFurnace Tune-Up & MaintenanceWall Furnace RepairFloor Furnace ReplacementBoiler & Radiant Heat RepairHeat Pumps & Ductless
Heat Pump RepairHeat Pump InstallationHeat Pump MaintenanceGas Furnace to Heat Pump ConversionDuctless Mini-Split InstallationDuctless Mini-Split RepairADU Heating & CoolingDucts & Attic
Duct RepairDuctwork ReplacementAir Duct CleaningDuct Sealing & Leak TestingWhole House Fan InstallationAttic InsulationIndoor Air
Indoor Air Quality TestingWhole-Home Air PurifiersUV Air SanitizersWhole-Home HumidifiersSystems & Commercial
Smart Thermostat InstallationHVAC Zoning SystemsFull HVAC System ReplacementHVAC InspectionHVAC Maintenance Plans24/7 Emergency HVAC RepairCommercial HVAC RepairCommercial HVAC MaintenanceRooftop & Package Unit RepairPasadena
Pasadena (all of the city)Bungalow HeavenMadison HeightsSan RafaelLinda VistaHastings RanchOak KnollAnnandaleProspect ParkHistoric HighlandsGarfield HeightsLamanda ParkSouth ArroyoChapman WoodsNearby cities
AltadenaSouth PasadenaSan MarinoArcadiaSierra MadreMonroviaDuarteGlendaleLa Canada FlintridgeLa CrescentaBurbankAlhambraSan GabrielTemple CityMonterey ParkRosemeadEl MonteAzusaGlendoraCovinaWest CovinaLos AngelesMontroseTujungaBaldwin ParkSouth El MonteMontebelloWhittierHacienda HeightsRowland HeightsLa PuenteWalnutDiamond BarSan DimasLa VerneClaremontPomonaUplandRancho CucamongaOntarioMontclairChino HillsBreaFullertonCounties
Los Angeles CountySan Bernardino CountyOrange CountyCooling in Pasadena, CA
Replace a corroded or leaking indoor AC coil with a matched one, a fresh drain pan and a proper vacuum and recharge.
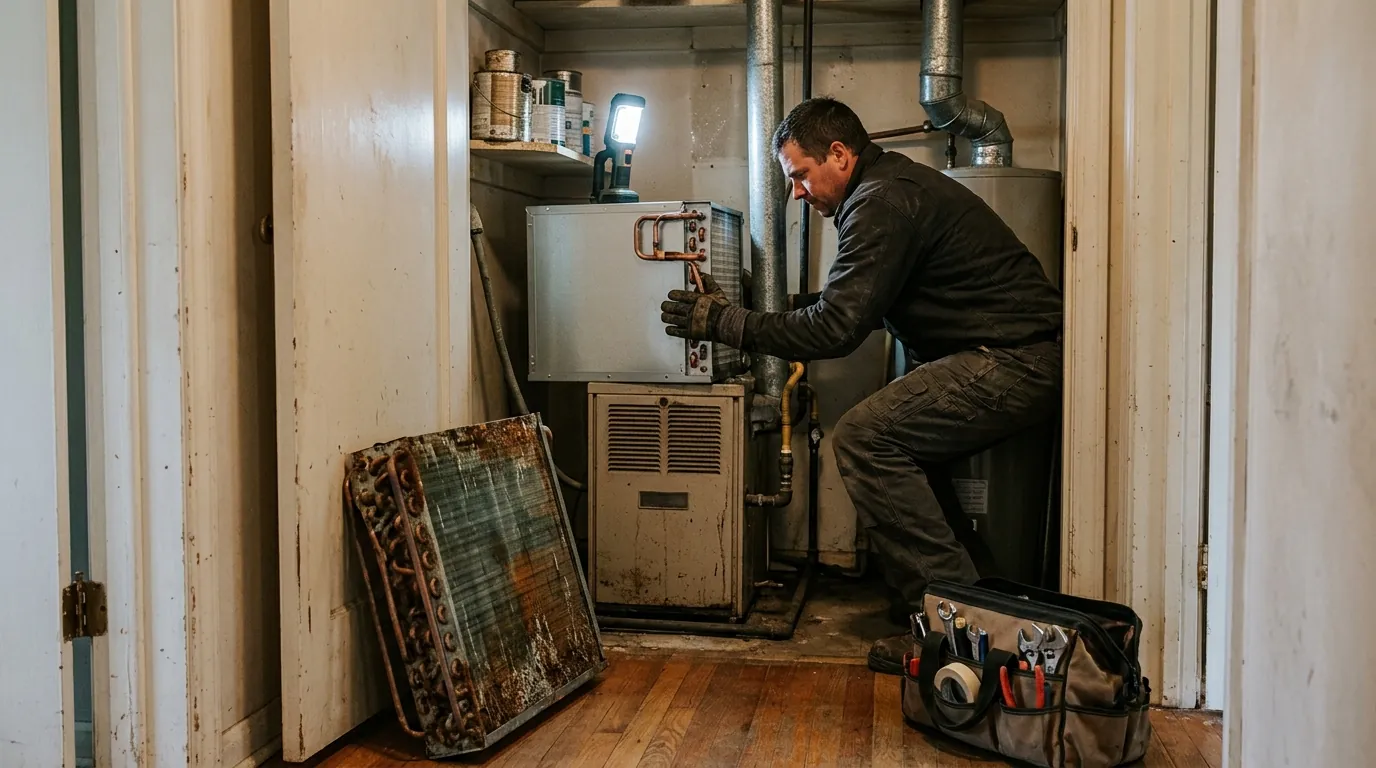
The evaporator coil sits above your furnace or inside the air handler and absorbs heat from indoor air. When it develops corrosion leaks or cracks, patching rarely lasts. Marco's replaces it with a coil matched to your outdoor unit and refrigerant, installs a new drain pan, brazes under nitrogen, pulls a deep vacuum and recharges by weight. Most replacements take one day.
Evaporator Coil Replacement
Your AC has two coils. The one outside gets rid of heat. The one inside, the evaporator, picks heat up. Warm house air blows across its thin aluminum fins and copper or aluminum tubes, refrigerant inside boils from liquid to gas and absorbs that heat, and the air comes out cooler and drier. When this coil leaks, the whole system loses its charge.
Evaporator coils are tucked out of sight in a cased box on top of the furnace, inside an attic air handler, or in a hall closet. Most people never look at them. That is why a leaking coil often shows up first as a system that cools less every summer, then not at all. Marco's replaces these coils properly so the rest of your system is protected.
Warning signs
When a technician's detector or pressure test isolates the leak to the indoor coil, especially from pinhole corrosion, replacement is usually more reliable than trying to patch it.
A system that needed refrigerant last year and needs it again this year often has a corroding coil. Formicary corrosion creates new pinholes over time, so the leak keeps returning.
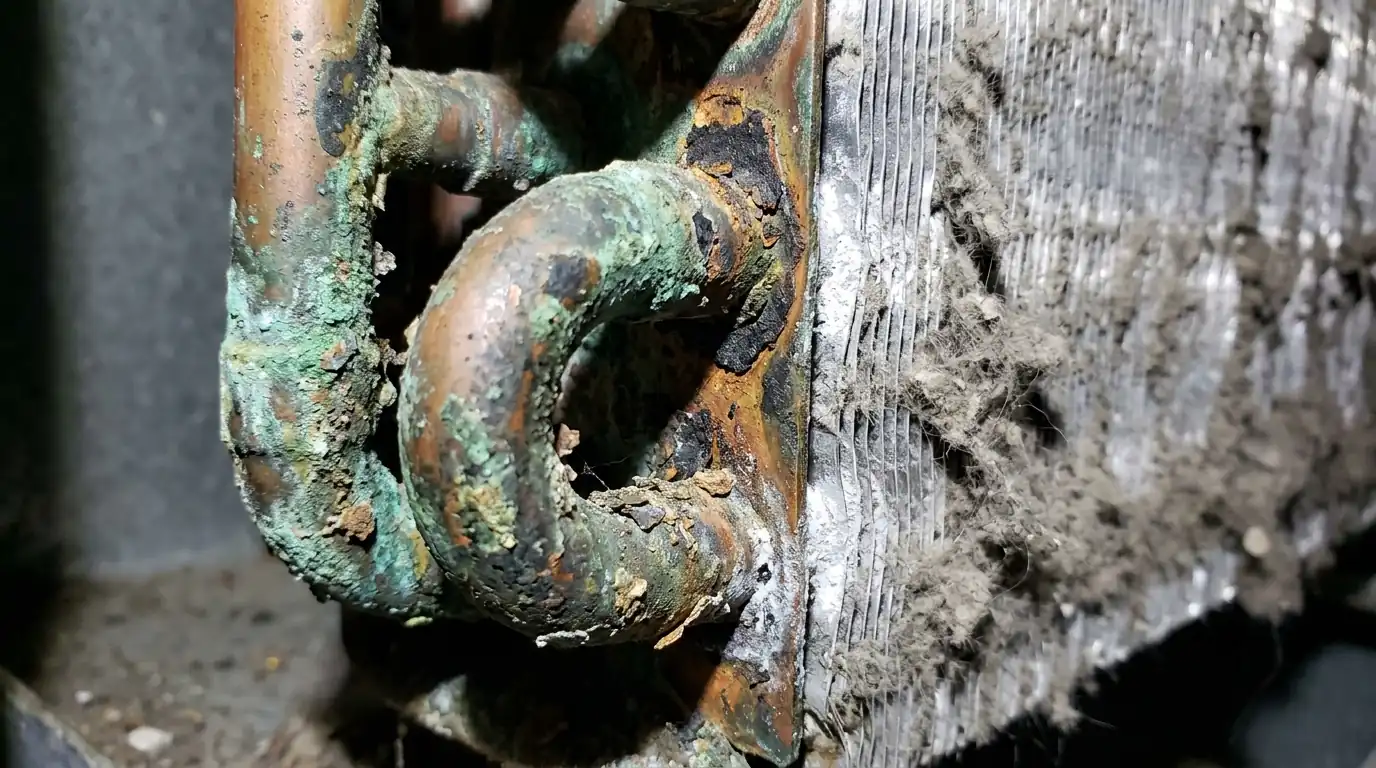
Black or green discoloration on copper tubes and white powder on aluminum fins are signs of corrosion. These areas tend to be where the leaks start.
Older coils sit in metal pans that rust through. Water dripping onto the furnace below can damage the burners, control board and heat exchanger over time.
A coil face caked with years of dust, pet hair and kitchen grease can block airflow so badly that cleaning will not restore it, particularly where fins have collapsed.
If a newer condenser was paired with an old coil sized for a different refrigerant or metering device, the system may never reach its rated cooling or efficiency.
The most common cause of coil leaks is formicary corrosion. Organic acids form when certain household chemicals in the air meet moisture on the coil: cleaning products, adhesives, new carpets and cabinets, air fresheners, even some building materials. These acids eat tiny tunnels through copper tubing that are hard to see but easy for refrigerant to escape through.
Coils in garages often fail sooner because of nearby paint, solvents, pool supplies and car exhaust. All-aluminum coils resist formicary corrosion better, which is one reason many manufacturers moved to them, though aluminum has its own repair challenges. A replacement coil is a good time to clear chemicals away from the furnace and seal return leaks that pull in garage air.
An evaporator coil is not one size fits all. It must match the outdoor unit's tonnage and refrigerant, fit the furnace or air handler width, and use the right metering device, either a fixed orifice piston or a thermostatic or electronic expansion valve. A mismatched coil can starve or flood the compressor and cost efficiency.
If your outdoor unit runs on R-410A, the replacement coil must be rated for R-410A. If it is a newer system on R-454B or R-32, the coil has to be designed for those A2L refrigerants. If the outdoor unit still uses R-22 and is well past its prime, replacing only the coil often does not make sense, and we will show you a system replacement price alongside.
We replace the drain pan with the coil, since the old pan is often rusted or cracked. The liquid line filter drier gets replaced to catch moisture and debris. Joints are brazed with a slow flow of dry nitrogen so no oxide scale forms inside the tubing. In attics, we check the secondary pan and float switch, since a new coil is no help if the overflow protection does not work.
After installation, the system is evacuated to remove air and moisture. We pull it down below 500 microns and confirm it holds before charging. The charge is weighed in based on the line set length and coil specifications, then checked by superheat or subcooling under real operating conditions.
Step by step
We verify the leak is in the indoor coil using an electronic detector or a nitrogen pressure test, so you do not replace a coil that was not the problem.
Model numbers on the condenser and furnace are checked to order a coil with the right tonnage, width, refrigerant and metering device.
Remaining refrigerant is recovered, the line set and drain are disconnected, and the old coil and pan come out of the furnace plenum or air handler.
The new coil and pan go in, the plenum is sealed, and joints are brazed under nitrogen with a new filter drier and a properly trapped drain.
A deep vacuum is pulled and held, refrigerant is charged by weight, and we confirm the temperature split, superheat and subcooling before the panels go back on.
Typical prices
Coil replacement cost is driven by the coil type, its size and how hard it is to reach. These are typical 2026 ranges for Pasadena and nearby San Gabriel Valley homes. Warranty coverage can lower the part cost. The final price comes after the technician sees the setup, and we quote before starting.
| Job | Typical range | What is included |
|---|---|---|
| Cased coil on a closet or garage furnace | $1,865 to $3,240 | Coil, pan, filter drier, vacuum and refrigerant charge |
| Horizontal coil in an attic | $2,215 to $3,785 | Added labor for attic access and a new secondary drain pan |
| Coil with part covered by warranty | $1,138 to $2,145 | Labor, refrigerant and drier when the coil part itself is covered |
| Plenum or transition rework | $318 to $847 | When the new coil does not fit the old sheet metal exactly |
Price moves with coil size and type, refrigerant cost, attic or crawlspace access and plenum modifications. R-22 systems are costlier because of reclaimed refrigerant prices, and that changes whether a coil swap is worth it. Compare other jobs in our Pasadena HVAC price guide.
In Pasadena homes, evaporator coils sit in three places. In many postwar ranch houses, the furnace and coil live in a hall closet or the garage, which makes access straightforward. In Craftsman and Spanish Revival homes where central air was added later, the coil often sits in a horizontal furnace in a cramped attic, sometimes reached through a small ceiling hatch. Those jobs take more labor and careful work around old plaster ceilings.
Homes that took in ash and smoke during the Eaton Fire, including parts of Altadena and the foothill edges of Pasadena and Sierra Madre, can have fine soot coating the indoor coil. Some coils clean up, while others are corroded or clogged enough to replace. We look closely, explain what we see, and recommend only what the coil actually needs.
Related work
We trace refrigerant leaks with electronic detectors, bubble tests and nitrogen pressure, then repair and recharge by weight.
Learn moreSwap a worn-out air conditioner for a correctly sized SEER2 system, with duct testing and permit work handled in one job.
Learn moreWater around the furnace or a stain on the ceiling: we clear the drain, fix the trap, replace pans and install float switches.
Learn moreNo heat on a cold night? We trace the ignition sequence, find the failed part and fix most furnaces in a single visit.
Learn moreOur technicians handle this work all over Pasadena and the surrounding San Gabriel Valley. A few of the places we cover:
Questions
A single, accessible leak at a joint can sometimes be rebrazed. Pinhole corrosion in the tubes is a different story, because more pinholes are usually forming nearby. Sealants injected into the system are not something we use, since they can clog metering devices and contaminate equipment. In most corrosion cases, replacement is the lasting fix.
Many coils carry a parts warranty, often longer if the system was registered after installation. Labor and refrigerant are usually not covered. We check the model and serial numbers and the registration status during diagnosis. If the coil part is covered, we handle the warranty claim and order the replacement through the distributor.
With the coil on hand, most closet or garage installs take five to seven hours. Attic coils can take a full day, depending on the access opening and how much sheet metal needs reworking. Matched coils sometimes take a few days to arrive, so we schedule the install once the part is in.
If the condenser is under about 10 years old and uses R-410A, replacing only the coil usually makes sense. If the condenser is old, uses R-22, or has its own problems, replacing both as a matched system is often the better value. We quote both options side by side.
Opening the system lets in air and moisture. Moisture mixes with refrigerant oil and forms acids that attack the compressor and new coil. A vacuum pump pulls that moisture out, and a micron gauge confirms the system is dry and leak-free before we add refrigerant. Skipping this step shortens equipment life.
Call our Pasadena line any hour. A person answers, asks a few questions about the system, and gives you an arrival window.